
Cloud speech — registration and setup
This guide is for speech-to-text (ASR). For screenshots and images, use the separate cloud OCR setup guide. A key for the same company can serve speech and text recognition (see the OCR guide); service activation, permissions and upload consent are separate.
Account and region guide
Section titled “Account and region guide”Start with Deepgram if you want an English-language cloud setup. Local recognition needs no cloud account. Cadenza supports Deepgram, OpenAI, Groq, Google Cloud, Microsoft Azure, AssemblyAI, ElevenLabs, five China-based services (iFLYTEK, Volcengine, Tencent Cloud, Alibaba Cloud, Baidu), and any service that copies the OpenAI transcription API.
| Provider | Registration or sign-in | Integration scope |
|---|---|---|
| Deepgram | International signup | English console; follow the steps below |
| Tencent Cloud | International site · China site | Walkthrough uses the China console; international accounts have not been validated in Cadenza |
| Alibaba Cloud | International site · China site | Walkthrough uses mainland NLS; international account and region compatibility require validation |
| Volcengine | China console | Doubao Speech; BytePlus credentials are not interchangeable |
| Baidu | Account portal | China speech service; console may be Chinese |
| iFLYTEK | Open platform | China speech dictation service; console may be Chinese |
| OpenAI | API platform | Pay per request; the key is also used by My AI models |
| Groq | Console | Whisper models; the key is also used by My AI models |
| Google Cloud | Cloud console | Speech-to-Text with an API key; the same key serves Google text recognition |
| Microsoft Azure | Azure portal | Speech resource with its key and region; a multi-service key also serves Azure text recognition |
| AssemblyAI | Dashboard | Short recordings (up to two minutes), one call |
| ElevenLabs | ElevenLabs | Scribe speech to text; up to five minutes |
| Other OpenAI-compatible service | Your provider’s documentation | Address, model and key are yours to fill in |
Changing the UI language does not change your primary engine, account region or upload destination. International and China accounts must not be assumed to share credentials or service activation. The translated screenshots below are references for the China consoles, not international-console walkthroughs.
Open Settings → Speech → Cloud services → Configure. Local models do not require a cloud account or API key.
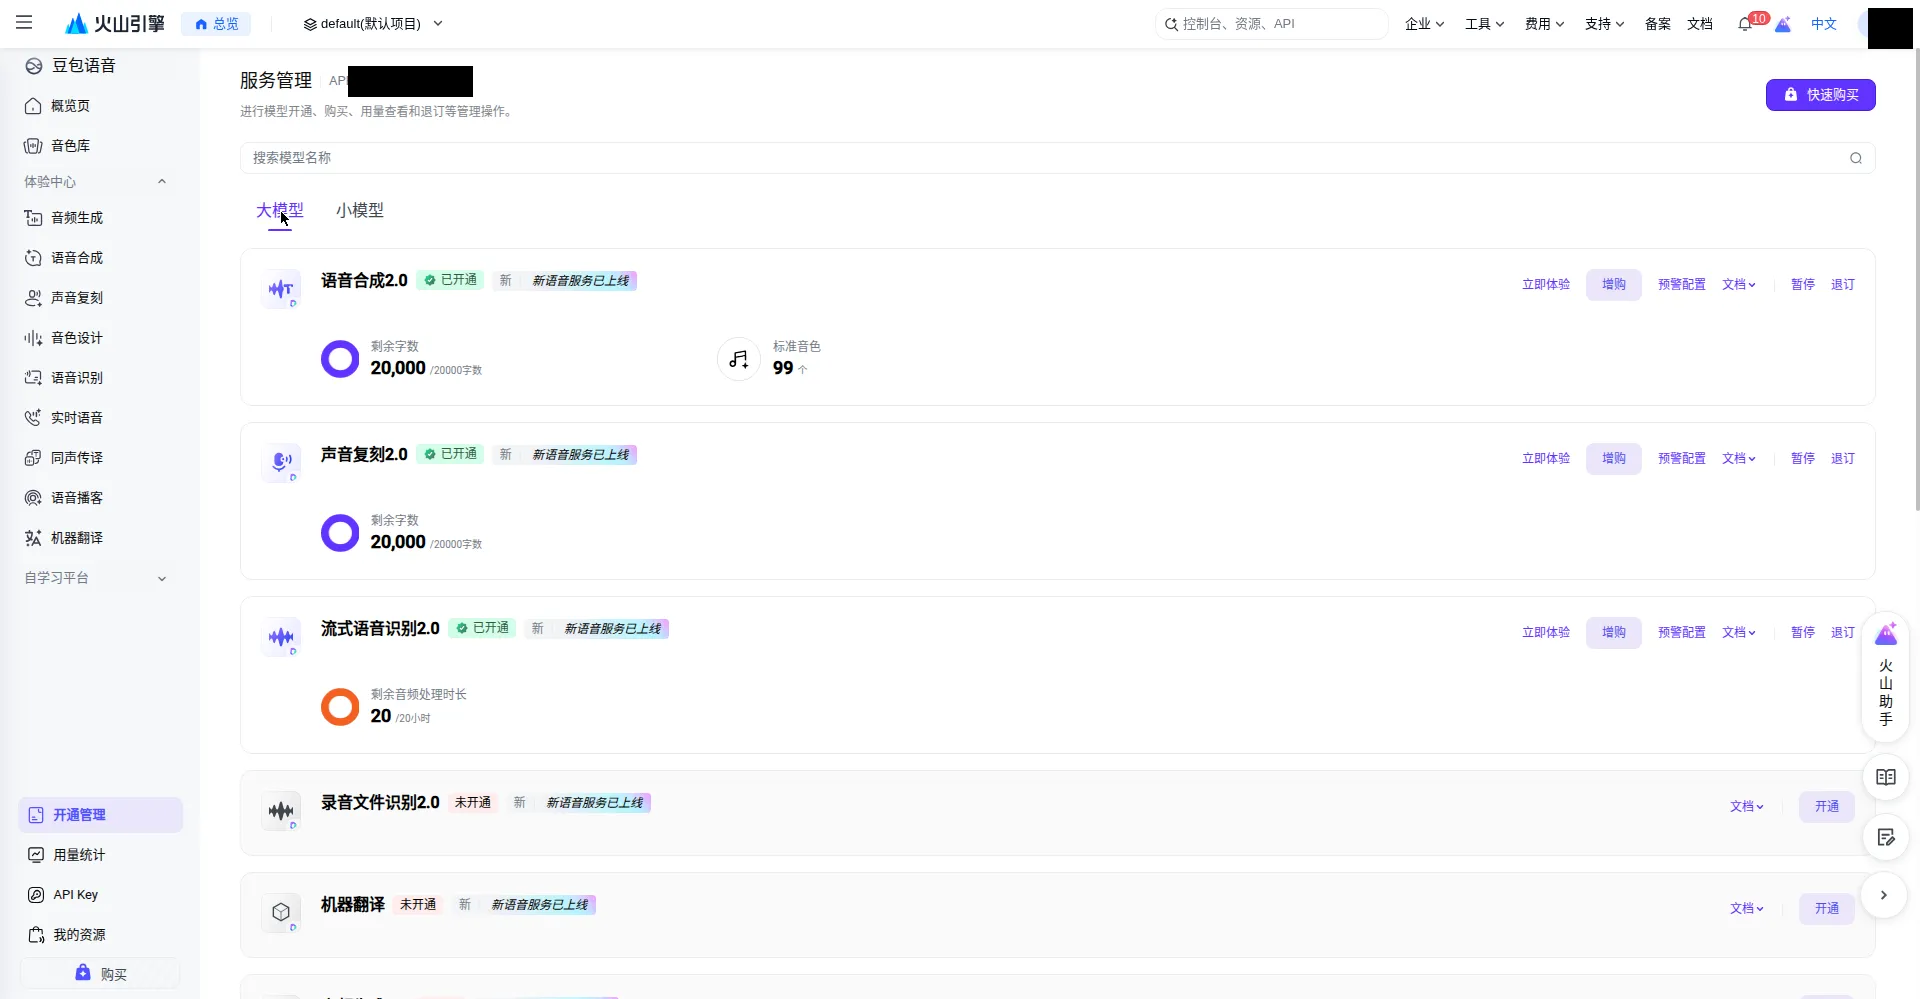
The screenshots were provided by Lulu on 7 October 2026, with account details and credentials obscured. They show Chinese consoles; labels may change. Check the provider’s pricing before activating a service.
Deepgram setup
Section titled “Deepgram setup”- Create a Deepgram account, then open the console.
- Select your project, open Settings → API Keys → Create a New API Key, and grant permission to call speech recognition.
- Copy the secret when it is displayed and paste it into Cadenza’s API Key field. Keep it private; the console does not show the secret again.
- Choose the recognition language in Cadenza, review upload consent, then test the connection. These steps have no account screenshots yet.
Official Deepgram key creation guide
Volcengine setup
Section titled “Volcengine setup”- Open the Doubao Speech console. Select 开通管理 (service activation), find 流式语音识别 2.0 (streaming speech recognition 2.0), and activate it if necessary. The screenshot shows an already activated service.
- Select API Key, then 创建 API Key (create API key). To copy an existing key, use the eye icon to reveal its full value.
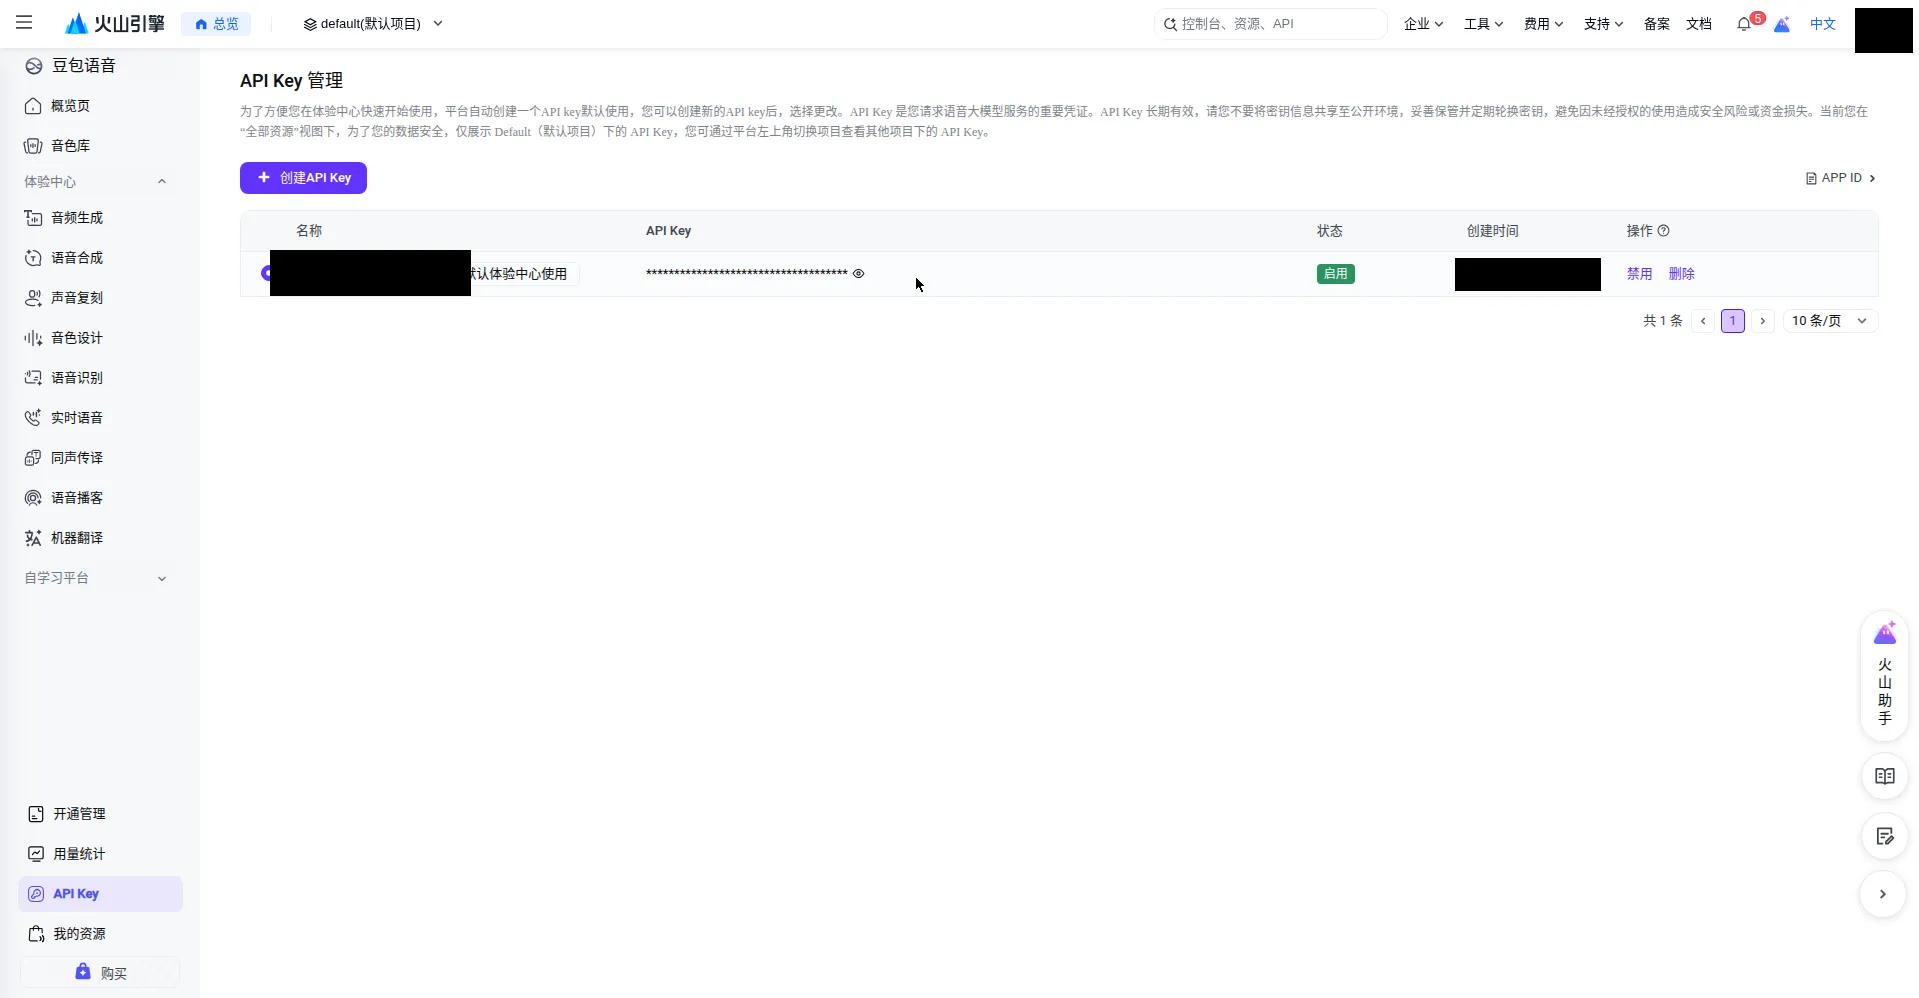
- Paste it into Cadenza’s API Key field. This integration uses a Doubao Speech API key, not a general IAM AccessKey. No App ID is needed.
Official API key documentation
Tencent Cloud
Section titled “Tencent Cloud”- Search for 访问管理 (access management) in the console. Open 访问密钥 → API 密钥管理 (access keys → API key management), create a key and retain its SecretId and SecretKey. The secret is shown only at creation. The screenshot shows the list, not the dialog revealing a new secret.
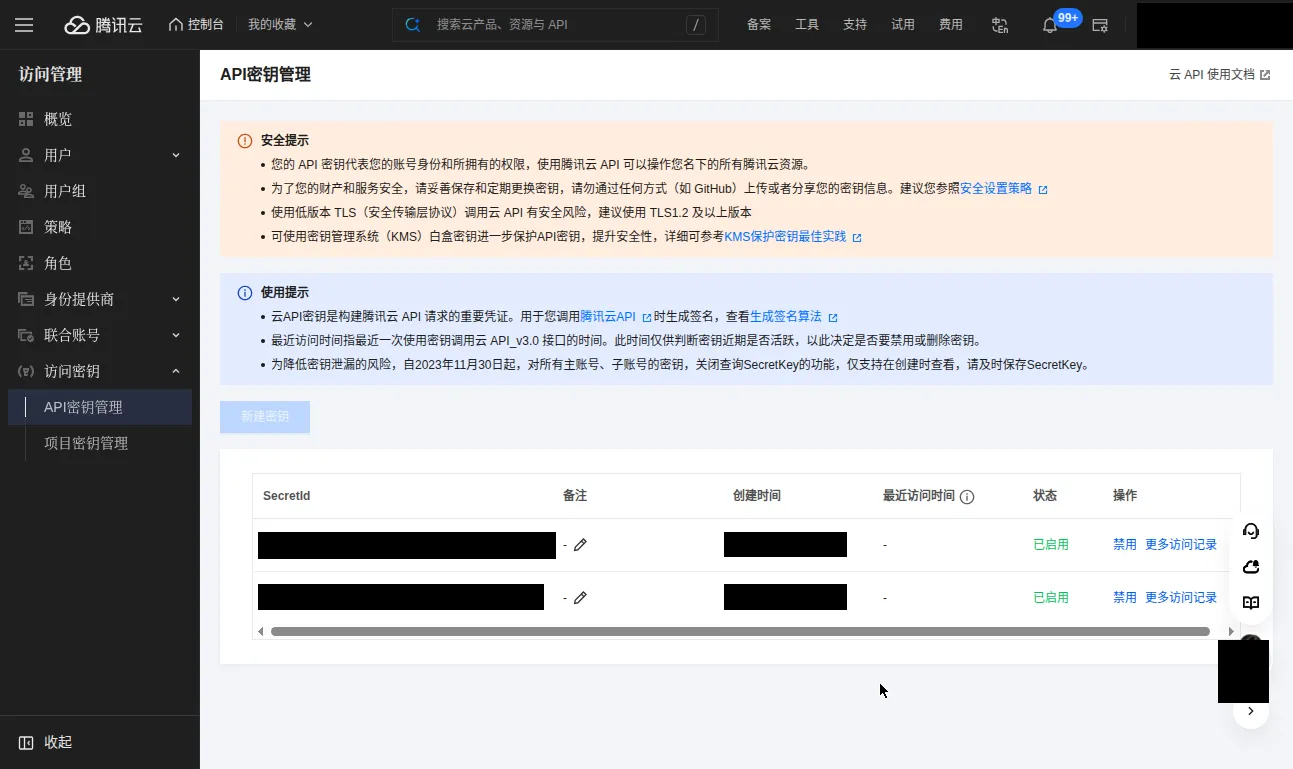
- Fill SecretId → Secret ID and SecretKey → Secret Key in Cadenza.
- Open the account menu at the top right, select account information and copy APP ID into Cadenza’s Account AppID field.
- Ensure speech recognition is activated and your credentials have permission to call it.
Alibaba Cloud
Section titled “Alibaba Cloud”- Open the RAM console and create an AccessKey pair for an authorized RAM user. Copy AccessKey ID and AccessKey Secret into Cadenza’s matching fields. Prefer a RAM user with speech service permissions. The screenshot shows the entry point; the create button may be unavailable for your identity or key limit.
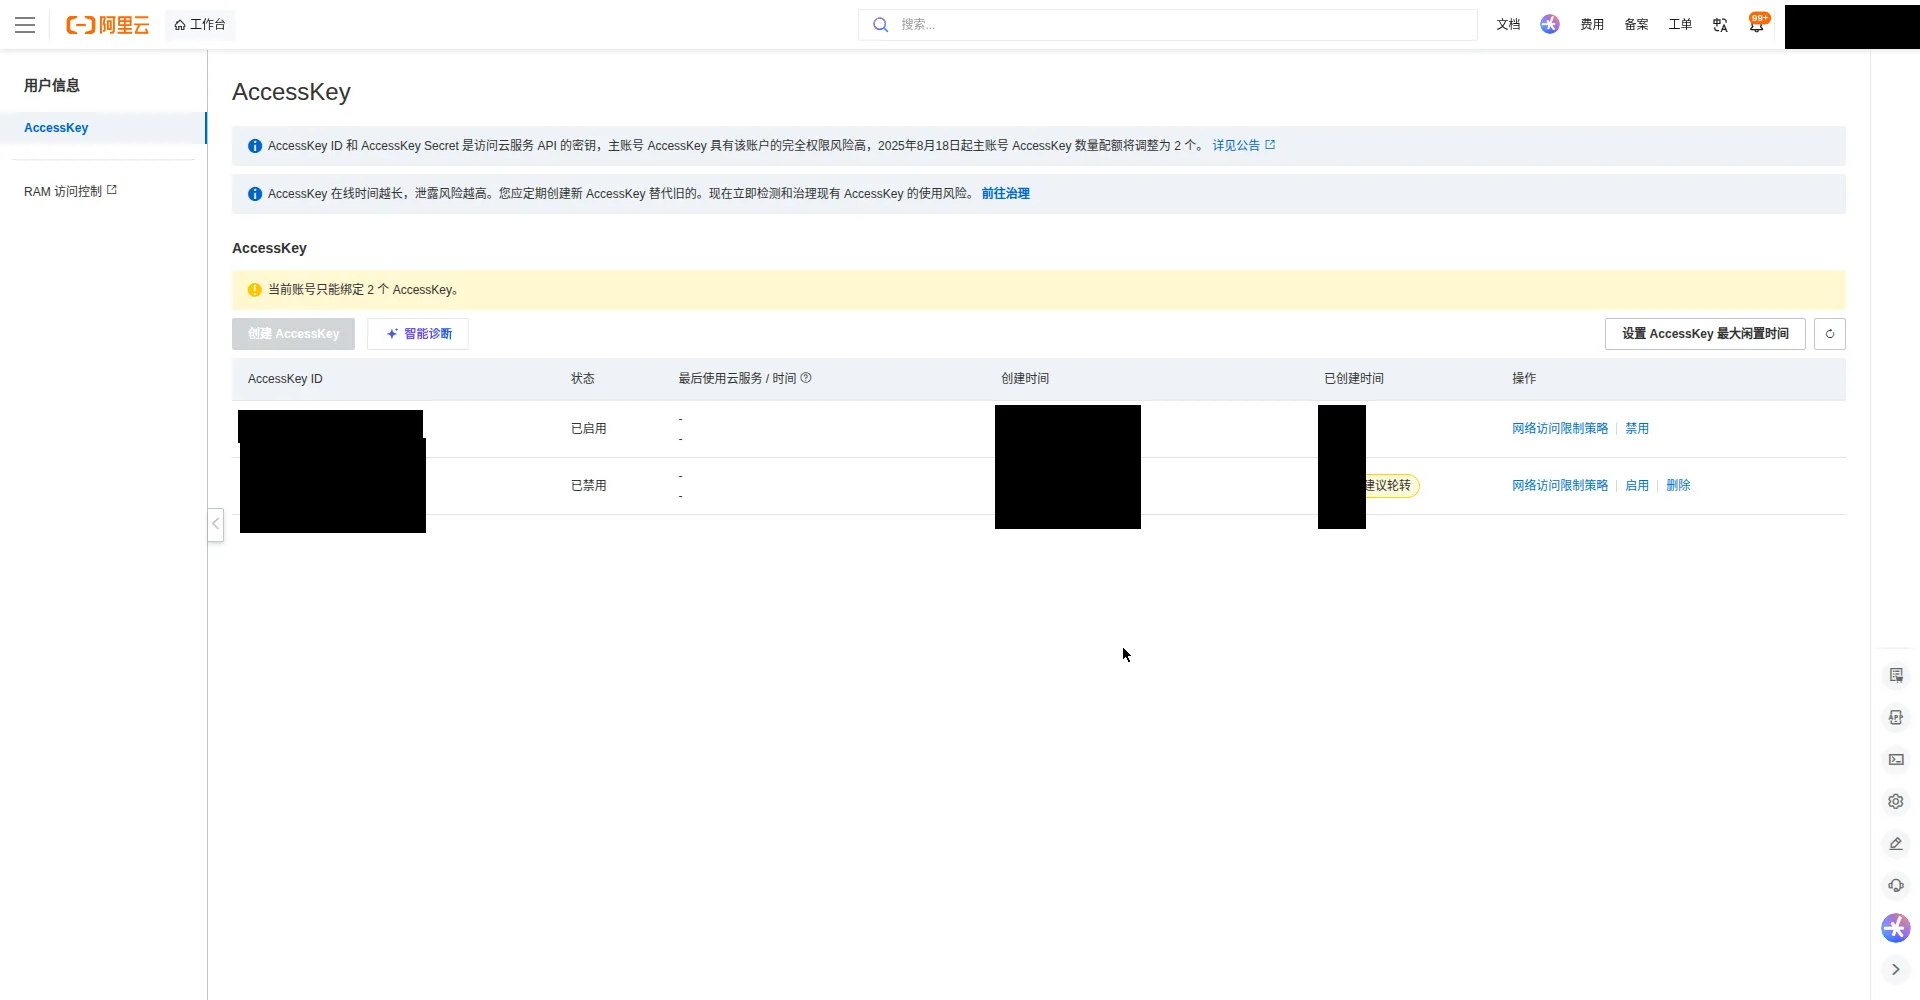
- Activate Intelligent Speech Interaction in the speech console, open 全部项目/项目管理 (all projects / project management), and create a project.
- Copy that project’s Appkey into Cadenza’s NLS AppKey field.
The project Appkey is different from AccessKey ID and AccessKey Secret. All three fields are required.
Official project guide · Official quick start
Baidu AI Cloud
Section titled “Baidu AI Cloud”Text reference only: the supplied tutorial has no Baidu screenshots or live-account validation.
Open Baidu AI Cloud, sign in and enter the speech console. Complete the account requirements, activate speech recognition and create a speech application. Fill its API Key and Secret Key into Cadenza’s corresponding fields.
iFLYTEK setup
Section titled “iFLYTEK setup”Field reference, without step-by-step screenshots: open the iFLYTEK console, select an application with speech dictation enabled, and find its service credentials. Fill App ID, API Key and API Secret into the three matching fields. API Secret and API Key are different values.
Official iFLYTEK authentication guide
OpenAI setup
Section titled “OpenAI setup”- Sign in at the OpenAI API platform and add billing. Speech recognition is charged per request.
- Open API keys, create a key and copy it. It is shown once.
- In Cadenza choose OpenAI, pick a model (
gpt-4o-mini-transcribeis the default;whisper-1is the older model), and paste the key into API Key. - Read the upload explanation (the whole recording is sent to OpenAI when you release the key, up to five minutes), allow it, and test the connection. The test reads the model list and sends no audio.
The same OpenAI key is used by My AI models, so you enter it once. Official speech-to-text guide
Groq setup
Section titled “Groq setup”- Create an account at the Groq console and open API keys.
- Create a key and copy it.
- In Cadenza choose Groq, pick a Whisper model (
whisper-large-v3-turbois the default) and paste the key into API Key. - Allow the upload as above and test. Groq limits requests and file sizes on its plans; the service’s message says so when a limit is reached.
The key is also used by My AI models. Official speech-to-text guide
Other OpenAI-compatible services
Section titled “Other OpenAI-compatible services”Any service that copies the OpenAI transcription API can be used, with its own address, model and key. Cadenza offers three presets, each with the address and model from its documentation:
- Together AI:
https://api.together.xyz/v1, modelopenai/whisper-large-v3 - Mistral (Voxtral):
https://api.mistral.ai/v1, modelvoxtral-mini-latest - SiliconFlow:
https://api.siliconflow.cn/v1, modelFunAudioLLM/SenseVoiceSmall
Check a preset against the provider’s current documentation before you rely on it. A Whisper server on this Mac also works: use http://127.0.0.1 or http://localhost with its port, and nothing leaves the Mac. An address must be https; http is accepted only for this Mac (127.0.0.1 or localhost). An address must not contain a user name, password or query string. The key is sent only to the address you enter, and the permission sheet names that address.
Google Cloud Speech-to-Text setup
Section titled “Google Cloud Speech-to-Text setup”- Create or select a project in the Google Cloud console and enable billing. Speech-to-Text is a paid service with a limited free tier.
- Enable the Cloud Speech-to-Text API for the project.
- Open APIs & Services → Credentials, create an API key, and restrict it to the Speech-to-Text API.
- In Cadenza choose Google, paste the key into API Key, and name the language of your recordings. The same key serves Google text recognition, so you enter it once.
- Allow the upload and test. Recordings are limited to one minute.
Official Speech-to-Text documentation
Microsoft Azure Speech setup
Section titled “Microsoft Azure Speech setup”- Sign in to the Azure portal and create a Speech resource.
- Open the resource’s Keys and Endpoint page. Copy one key and note the region, for example
eastus. - In Cadenza choose Azure, paste the key into API Key and the region into the region field. The resource address from the portal also works, as long as it is
httpson a Microsoft Azure host. - Name the language of your recordings. Recordings are limited to one minute. Azure’s recognizer keeps words as spoken and does not take your vocabulary.
A multi-service Azure key also serves Azure text recognition; a key for a Speech-only resource does not read pictures. Official Speech documentation
AssemblyAI setup
Section titled “AssemblyAI setup”- Create an account at AssemblyAI and open the API keys dashboard.
- Copy the key into API Key in Cadenza, and choose AssemblyAI.
- Name the language. If you do not, English is assumed. Recordings are limited to two minutes; the short-clip service takes one request per recording.
- Allow the upload and test. The test reads your transcripts list and sends no audio.
ElevenLabs Scribe setup
Section titled “ElevenLabs Scribe setup”- Create an account at ElevenLabs and create an API key in your account settings.
- In Cadenza choose ElevenLabs, paste the key into API Key, and allow the upload.
- Scribe detects the language unless you name it. Recordings are limited to five minutes. It does not add sound descriptions such as laughter.
- Test the connection; the test reads the model list and sends no audio.
After filling in the fields
Section titled “After filling in the fields”- Read the audio-upload explanation and decide whether to allow this provider. Without consent, the app does not connect to it.
- Click Test connection and read the feedback beside it. The check tests connection and authentication, sends no recording, and does not replace a recognition test.
- Click Save, select the provider as your primary model, and try a sentence on the input page.
Cancelling stops subsequent uploads but cannot recall audio already sent, whether streamed while you speak or sent as a whole recording when you release the key. Do not put keys in feedback, screenshots or public documentation.
Original tutorial: Lulu, 2026-10-07. Adapted with field references for this app.